 番茄网
番茄网在本教程中,您将学习如何在 Rocky Linux 8 上安装 Passbolt 密码管理器 。Passbolt 是一个免费、开源、自托管、可扩展、基于 OpenPGP 的密码管理器,它使团队能够安全地存储他们的个人信息并共享他们的通用凭证。它提供基于订阅的版本和社区版本。本教程重点介绍社区版的设置。
在撰写本文时,还没有在 Rocky Linux 8 上设置 Passbolt 的官方指南。因此,我们将从源代码安装 Passbolt。
在 Rocky Linux 8 上安装 Passbolt 密码管理器
先决条件
- 安装新的 Vanilla Rocky Linux 8 服务器。
- 为服务器分配至少 2 GB RAM 和 2 个 vCPU
- 服务器的可解析主机名或 IP 地址。
- 在 Rocky Linux 8 上安装 LEMP/LAMP 堆栈
在 Rocky Linux 8 上安装 LAMP/LEMP 堆栈
假设已满足上述前三个先决条件,继续在 Rocky Linux 8 服务器上安装 LEMP/LAMP 堆栈。
请注意,Passbolt 是用 PHP 编写的,因此它需要 LEMP 或 LAMP 堆栈才能运行。
按照以下任一链接在 Rocky Linux 8 上设置 LAMP 或 LEMP 堆栈。
确保安装 PHP 7.4。
在本教程中,我们使用 LAMP 堆栈来运行 Passbolt。
php -vPHP 7.4.6 (cli) (built: May 12 2020 08:09:15) ( NTS )
Copyright (c) The PHP Group
Zend Engine v3.4.0, Copyright (c) Zend Technologies
with Zend OPcache v7.4.6, Copyright (c), by Zend Technologies创建 Passbolt 数据库和数据库用户
登录 MariaDB/MySQL 数据库服务器;
mysql上述命令假定您的 MySQL/MariaDB 数据库 unix_socket 用于身份验证,并且您以 root 用户身份执行该命令。如果您不是 root 并且有 sudo 权限,只需使用; sudo mysql -u root. 否则,您可以使用 mysql -u root -p 命令。
替换你认为合适的数据库名称、数据库用户用户名和密码。
创建支持非拉丁字符和表情符号的 Passbolt 数据库。
CREATE DATABASE passbolt CHARACTER SET utf8mb4 COLLATE utf8mb4_unicode_ci;创建 Passbolt 数据库用户并授予 Passbolt 数据库的所有权限。
grant all on passbolt.* to passman@localhost identified by 'p@SSw0rd123';重新加载权限表并退出数据库;
flush privileges;
quit
安装其他必需的依赖项
要成功安装和运行 Passbolt,还需要其他工具和 PHP 扩展。
安装额外的 PHP 模块/扩展
dnf install php-intl php-gd php-mysqli php-json php-pear php-devel php-mbstring git make unzip wget mod_ssl openssl在 Rocky Linux 上启用 PHP Gnupg 扩展
Passbolt 需要启用 PHP Gnupg 扩展才能成功安装。因此,可以在 Rocky Linux 上启用 PHP Gnupg 扩展,如下所示;
dnf config-manager --set-enabled powertoolsdnf install gpgme gpgme-develpecl install gnupgecho "extension=gnupg.so" >> /etc/php.ini在 Rocky Linux 8 上安装 PHP Composer
通过以下链接在 Rocky Linux 8 上安装 PHP Composer;
在 Rocky Linux 8 上安装 PHP Composer
将 Passbolt Github 存储库克隆到 Apache Web 根目录
由于我们要从源代码安装 Passbolt,因此您需要将其 Gtihub 存储库克隆到您的 Web 根目录。
在本教程中,我们将 /var/www/passbolt 其用作 Web 根目录。
mkdir /var/www/passboltgit clone https://github.com/passbolt/passbolt_api.git /var/www/passbolt由于我们使用 Apache 作为 Web 服务器,因此您需要将 Passbolt Web 根目录的所有权(用户和组)设置为 Apache 用户和组;
chown -R apache: /var/www/passbolt还要创建 Composer 缓存目录并将所有权分配给 apache 用户。
mkdir /usr/share/httpd/.cache/chown -R apache: /usr/share/httpd/.cache/接下来,导航到 Passbolt Web 根目录并使用 composer.
cd /var/www/passbolt以非特权用户身份运行 composer。在这种情况下,我们使用 Passbolt 目录的所有者(Apache Web 用户,apache)。
sudo -u apache composer install --no-dev在安装过程中,系统会提示您是否调整目录权限。接受并继续。
> App\Console\Installer::postInstall
Created `config/app.php` file
Created `/var/www/passbolt/logs` directory
Created `/var/www/passbolt/tmp/cache/models` directory
Created `/var/www/passbolt/tmp/cache/persistent` directory
Created `/var/www/passbolt/tmp/cache/views` directory
Created `/var/www/passbolt/tmp/sessions` directory
Created `/var/www/passbolt/tmp/tests` directory
Set Folder Permissions ? (Default to Y) [Y,n]? y
生成用于验证 JSON 请求的 OpenPGP 密钥
为了对传出的 JSON 请求进行身份验证和签名,Passbolt API 使用 PGP 密钥。因此,运行以下命令来生成密钥;
gpg --full-generate-key当提示输入密码时, 请勿 设置它。只需按 ENTER 并确认您不想设置它。此外, 请勿设置到期日期。
将 YOUR_NAME 和 YOUR_EMAIL_ID替换 为您的姓名和电子邮件 ID。
Please select what kind of key you want:
   (1) RSA and RSA (default)
   (2) DSA and Elgamal
   (3) DSA (sign only)
   (4) RSA (sign only)
  (14) Existing key from card
Your selection? 1
RSA keys may be between 1024 and 4096 bits long.
What keysize do you want? (3072) 4096
Requested keysize is 4096 bits
Please specify how long the key should be valid.
         0 = key does not expire
        = key expires in n days
      w = key expires in n weeks
      m = key expires in n months
      y = key expires in n years
Key is valid for? (0) 0
Key does not expire at all
Is this correct? (y/N) y

GnuPG needs to construct a user ID to identify your key.

Real name: YOUR_NAME
Email address: ENTER_YOUR_EMAIL_ID
Comment:
You selected this USER-ID:
    "YOUR_NAME "

Change (N)ame, (C)omment, (E)mail or (O)kay/(Q)uit? O
...
gpg: /root/.gnupg/trustdb.gpg: trustdb created
gpg: key 505EFE2707BC4A9F marked as ultimately trusted
gpg: directory '/root/.gnupg/openpgp-revocs.d' created
gpg: revocation certificate stored as '/root/.gnupg/openpgp-revocs.d/9E968F508E35DDE61A819F59505EFE2707BC4A9F.rev'
public and secret key created and signed.

pub   rsa4096 2021-06-25 [SC]
      9E968F508E35DDE61A819F59505EFE2707BC4A9F
uid                      Kifarunix
sub   rsa4096 2021-06-25 [E]
记下密钥指纹并将其保存在某处,因为稍后在设置中将需要它。
将公钥和私钥导出并存储在 Passbolt 配置目录中。
gpg --armor --export-secret-keys YOUR_EMAIL_ID > /var/www/passbolt/config/gpg/serverkey_private.ascgpg --armor --export YOUR_EMAIL_ID > /var/www/passbolt/config/gpg/serverkey.asc接下来,为 Apache Web 服务器用户初始化 gpg 密钥环,以便 Passbolt 身份验证可以工作。
mkdir /usr/share/httpd/.gnupg && chown -R apache: /usr/share/httpd/.gnupgchmod 700 /usr/share/httpd/.gnupgsudo su -s /bin/bash -c "gpg --list-keys" apache在 Rocky Linux 8 上配置 Passbolt
复制示例 Passbolt 配置文件,将其重命名如下;
cp /var/www/passbolt/config/passbolt{.default,}.php接下来打开配置文件进行修改;
vim /var/www/passbolt/config/passbolt.php设置应用程序 URL
通过适当地替换参数的值,将应用程序 url 设置为您的 Passbolt 应用程序的网址 fullBaseUrl 。
        // 'fullBaseUrl' => 'https://www.passbolt.test',
        'fullBaseUrl' => 'https://passbolt.kifarunix-demo.com',
定义数据库连接设置
配置 Passbolt 数据库连接设置;
    // Database configuration.
    'Datasources' => [
        'default' => [
            'host' => 'localhost',
            //'port' => 'non_standard_port_number',
            'username' => 'passman',
            'password' => 'p@SSw0rd123',
            'database' => 'passbolt',
        ],
    ],
配置 Passbolt 电子邮件设置
配置 Passbolt 电子邮件服务器设置。我们使用 Gmail SMTP 作为我们的中继服务器。
  // Email configuration.
    'EmailTransport' => [
        'default' => [
            'host' => 'smtp.gmail.com',
            'port' => 587,
            'username' => 'username@gmail.com',
            'password' => 'secretpassword',
            // Is this a secure connection? true if yes, null if no.
            'tls' => true,
            //'timeout' => 30,
            //'client' => null,
            //'url' => null,
        ],
    ],
    'Email' => [
        'default' => [
            // Defines the default name and email of the sender of the emails.
            'from' => ['passbolt@kifarunix-demo.com' => 'Kifarunix-demo Passbolt'],
            //'charset' => 'utf-8',
            //'headerCharset' => 'utf-8',
        ],
    ],
指定 GPG 密钥指纹
提取 GPG 密钥指纹并将其设置为 fingerprint 参数的值。
gpg --list-keys --fingerprint | grep -i -B 2 YOUR_EMAIL_ID pub rsa4096 2020-07-15 [SC]
C503 E615 618B 3433 1BA1 D26D 85EB 40BA 1D5D E890
uid [ultimate] <YOUR_NAME> <YOUR_EMAIL_ID>
sub rsa4096 2020-07-15 [E]复制突出显示的字符串并删除空格并将其粘贴为 fingerprint 参数的值。此外,通过删除这些行开头的两个正斜杠来取消对指纹下方的公共和私人行的注释;
...
            'serverKey' => [
                // Server private key fingerprint.
                'fingerprint' => 'C503E615618B34331BA1D26D85EB40BA1D5DE890',
                'public' => CONFIG . 'gpg' . DS . 'serverkey.asc',
                'private' => CONFIG . 'gpg' . DS . 'serverkey_private.asc',
            ],
保存并退出配置文件。
为 Passbolt 创建 Apache VirtualHost 配置并启用 HTTPS
接下来,为 Passbolt 创建一个专用的 Apache 虚拟主机配置文件。
cat > /etc/httpd/conf.d/passbolt.conf  << 'EOL'
<VirtualHost *:80>

        ServerAdmin passbolt.kifarunix-demo.com
        DocumentRoot /var/www/passbolt

	Redirect / https://passbolt.kifarunix-demo.com
</VirtualHost>
#SSLStaplingCache "shmcb:logs/stapling-cache(150000)"
ServerSignature Off
ServerTokens Prod
<VirtualHost _default_:443>
        ServerAdmin passbolt.kifarunix-demo.com
        DocumentRoot /var/www/passbolt


        ErrorLog /var/log/httpd/passbolt_error.log
        CustomLog /var/log/httpd/passbolt_access.log combined


        SSLEngine on
        SSLCertificateFile      /etc/pki/tls/certs/ssl-cert-passbolt.pem
        SSLCertificateKeyFile /etc/pki/tls/private/ssl-cert-passbolt.key
        SSLCACertificateFile /etc/pki/tls/certs/ssl-cacert-passbolt.pem

        SSLCipherSuite EECDH+AESGCM:EDH+AESGCM
        SSLProtocol -all +TLSv1.3 +TLSv1.2
        SSLOpenSSLConfCmd Curves X25519:secp521r1:secp384r1:prime256v1
        SSLHonorCipherOrder On
        Header always set Strict-Transport-Security "max-age=63072000; includeSubDomains; preload"
        Header always set X-Frame-Options DENY
        Header always set X-Content-Type-Options nosniff
        SSLCompression off
        #SSLUseStapling on
        SSLSessionTickets Off

	<Directory /var/www/passbolt/>
  		Options FollowSymLinks MultiViews
  		AllowOverride All
		Require all granted
	</Directory>


        <FilesMatch "\.(cgi|shtml|phtml|php)$">
                        SSLOptions +StdEnvVars
        </FilesMatch>
        <Directory /usr/lib/cgi-bin>
                        SSLOptions +StdEnvVars
        </Directory>

</VirtualHost>
EOL
保存并退出配置文件。
生成 TLS 证书
如果您注意到,我们在配置中启用了 HTTP > HTTPS 重定向。
获取商业信任的 CA 证书并将其安装在 Apache 配置中指定的目录中。
运行 Apache 配置语法检查。
apachectl -t如果你得到输出,Syntax OK你可以继续,否则,在你继续之前解决问题。
确保 启用Apache rewrite、 ssl、 模块;headers
httpd -M | grep -E "rew|ssl|head"样本输出:
 headers_module (shared)
 rewrite_module (shared)
 ssl_module (shared)
如果您收到以下错误;
AH00526: Syntax error on line 85 of /etc/httpd/conf.d/ssl.conf:
SSLCertificateFile: file '/etc/pki/tls/certs/localhost.crt' does not exist or is empty
重新启动 Apache 以修复
systemctl restart httpd运行 Passbolt 安装脚本
接下来,执行 Passbolt 安装脚本。
chown -R apache: /var/www/passboltcd /var/www/passboltsudo su -s /bin/bash -c "./bin/cake passbolt install --no-admin" apache默认情况下,当脚本运行时,它会提示您创建管理用户。我们通过添加 --no-admin 选项禁用了它。稍后我们将创建管理员帐户。
    ____                  __          ____
    / __ \____  _____ ____/ /_  ____  / / /_
   / /_/ / __ `/ ___/ ___/ __ \/ __ \/ / __/
  / ____/ /_/ (__  |__  ) /_/ / /_/ / / /
 /_/    \__,_/____/____/_.___/\____/_/\__/

 Open source password manager for teams
-------------------------------------------------------------------------------
Running baseline checks, please wait...
Critical healthchecks are OK
Cleaning up existing tables if any.
-------------------------------------------------------------------------------
0 tables dropped
Install the schema and default data.
-------------------------------------------------------------------------------
using migration paths
 - /var/www/passbolt/config/Migrations
using seed paths
 - /var/www/passbolt/config/Seeds
using environment default
using adapter mysql
using database passbolt
ordering by creation time

 == 20170830064410 V162InitialMigration: migrating
 == 20170830064410 V162InitialMigration: migrated 15.9084s
...
...

All Done. Took 100.0627s
Import the server private key in the keyring
-------------------------------------------------------------------------------
Importing /var/www/passbolt/config/gpg/serverkey_private.asc
Keyring init OK
Passbolt installation success! Enjoy! ☮
运行运行状况检查以验证一切正常。
cd /var/www/passboltsudo su -s /bin/bash -c "./bin/cake passbolt healthcheck" apache样本输出;
     ____                  __          ____
    / __ \____  _____ ____/ /_  ____  / / /_
   / /_/ / __ `/ ___/ ___/ __ \/ __ \/ / __/
  / ____/ /_/ (__  |__  ) /_/ / /_/ / / /
 /_/    \__,_/____/____/_.___/\____/_/\__/

 Open source password manager for teams
-------------------------------------------------------------------------------
 Healthcheck shell
-------------------------------------------------------------------------------

 Environment

 [PASS] PHP version 7.4.6.
 [PASS] PCRE compiled with unicode support.
 [PASS] The temporary directory and its content are writable.
 [PASS] The public image directory and its content are writable.
 [PASS] The logs directory and its content are writable.
 [PASS] GD or Imagick extension is installed.
 [PASS] Intl extension is installed.
 [PASS] Mbstring extension is installed.

 Config files

 [PASS] The application config file is present
 [PASS] The passbolt config file is present

 Core config

 [PASS] Debug mode is off.
 [PASS] Cache is working.
 [PASS] Unique value set for security.salt
 [PASS] Full base url is set to https://passbolt.kifarunix-demo.com
 [PASS] App.fullBaseUrl validation OK.
 [PASS] /healthcheck/status is reachable.

 SSL Certificate

 [PASS] SSL peer certificate validates
 [PASS] Hostname is matching in SSL certificate.
 [PASS] Not using a self-signed certificate

 Database

 [PASS] The application is able to connect to the database
 [PASS] 25 tables found
 [PASS] Some default content is present
 [PASS] The database schema up to date.

 GPG Configuration

 [PASS] PHP GPG Module is installed and loaded.
 [PASS] The environment variable GNUPGHOME is set to /usr/share/httpd/.gnupg.
 [PASS] The directory /usr/share/httpd/.gnupg containing the keyring is writable by the webserver user.
 [PASS] The server OpenPGP key is not the default one
 [PASS] The public key file is defined in config/passbolt.php and readable.
 [PASS] The private key file is defined in config/passbolt.php and readable.
 [PASS] The server key fingerprint matches the one defined in config/passbolt.php.
 [PASS] The server public key defined in the config/passbolt.php (or environment variables) is in the keyring.
 [PASS] There is a valid email id defined for the server key.
 [PASS] The public key can be used to encrypt a message.
 [PASS] The private key can be used to sign a message.
 [PASS] The public and private keys can be used to encrypt and sign a message.
 [PASS] The private key can be used to decrypt a message.
 [PASS] The private key can be used to decrypt and verify a message.
 [PASS] The public key can be used to verify a signature.

 Application configuration

 [PASS] Using latest passbolt version (3.2.1).
 [PASS] Passbolt is configured to force SSL use.
 [PASS] App.fullBaseUrl is set to HTTPS.
 [PASS] Selenium API endpoints are disabled.
 [PASS] Search engine robots are told not to index content.
 [PASS] Registration is closed, only administrators can add users.
 [PASS] Serving the compiled version of the javascript app
 [PASS] All email notifications will be sent.

 [PASS] No error found. Nice one sparky!
从浏览器完成密码设置
在防火墙上打开 Apache 端口;
firewall-cmd --add-service={http,https} --permanentfirewall-cmd --reload禁用 SELinux(我们强烈不建议您在生产系统中执行此操作)。
sed -i 's/=enforcing/=permissive/' /etc/selinux/config创建密码管理用户
您现在可以使用该 ./bin/cake passbolt register_user 命令创建 Passbolt 管理员用户。以下是此命令的命令行选项;
cd /var/www/passbolt./bin/cake passbolt register_user --help ____ __ ____
/ __ \____ _____ ____/ /_ ____ / / /_
/ /_/ / __ `/ ___/ ___/ __ \/ __ \/ / __/
/ ____/ /_/ (__ |__ ) /_/ / /_/ / / /
/_/ \__,_/____/____/_.___/\____/_/\__/
Open source password manager for teams
---------------------------------------------------------------
Register a new user.
Usage:
cake passbolt register_user [options]
Options:
--first-name, -f The user first name
--help, -h Display this help.
--interactive, -i Enable interactive mode
--interactive-loop Enable interactive mode (default:
3)
--last-name, -l The user last name
--quiet, -q Enable quiet output.
--role, -r The User role, such as "admin" or "user"
--username, -u The user email aka username
--verbose, -v Enable verbose output.所以让我们创建一个管理员用户;
cd /var/www/passboltsudo su -s /bin/bash -c "./bin/cake passbolt register_user -u admin@kifarunix.com -f Kifarunix -l Demo -r admin" apache ____ __ ____
/ __ \____ _____ ____/ /_ ____ / / /_
/ /_/ / __ `/ ___/ ___/ __ \/ __ \/ / __/
/ ____/ /_/ (__ |__ ) /_/ / /_/ / / /
/_/ \__,_/____/____/_.___/\____/_/\__/
Open source password manager for teams
---------------------------------------------------------------
User saved successfully.
To start registration follow the link provided in your mailbox or here:
https://passbolt.kifarunix-demo.com/setup/install/4dbe1c54-79bc-48b5-9ab3-705afd5af097/e34ea69b-0954-401b-8232-946ce721eda9复制用户注册时提供的链接并将其粘贴到浏览器地址栏,以便您可以使用它来完成 Passbolt 的设置。
安装 Passbolt 浏览器插件
为您的特定浏览器下载并安装插件,在此演示中,我们使用 Firefox。
因此,单击 下载扩展程序 下载以安装 Passbolt Firefox 附加扩展程序。
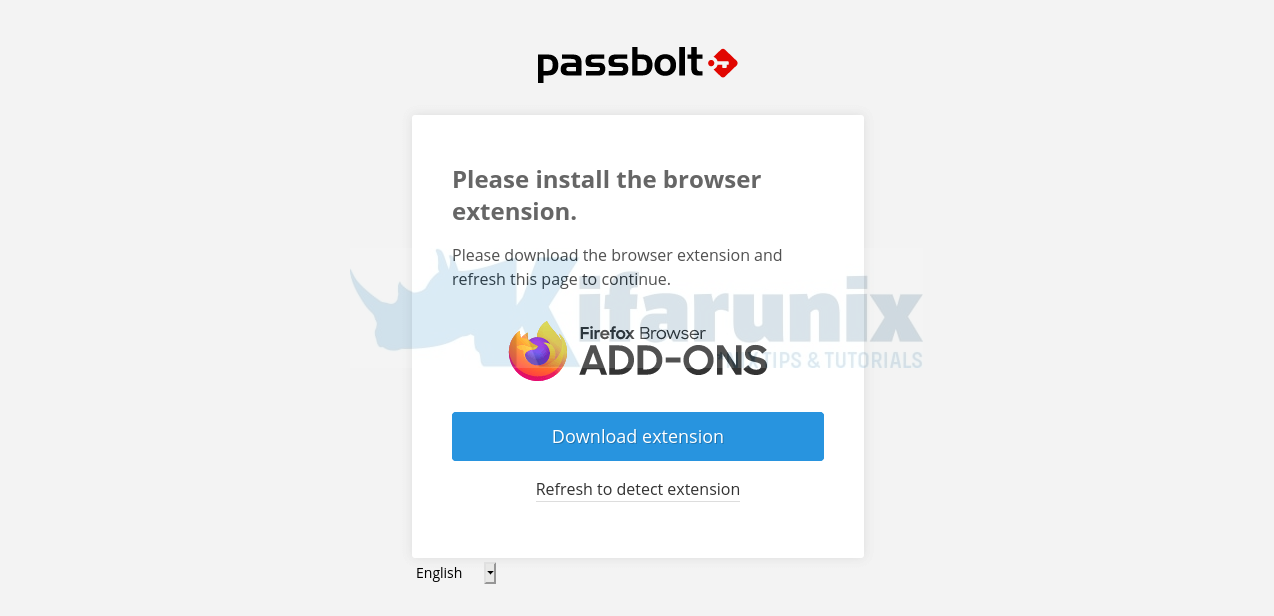
安装扩展后,单击Refresh 以检测扩展。
设置 Passbolt 密码
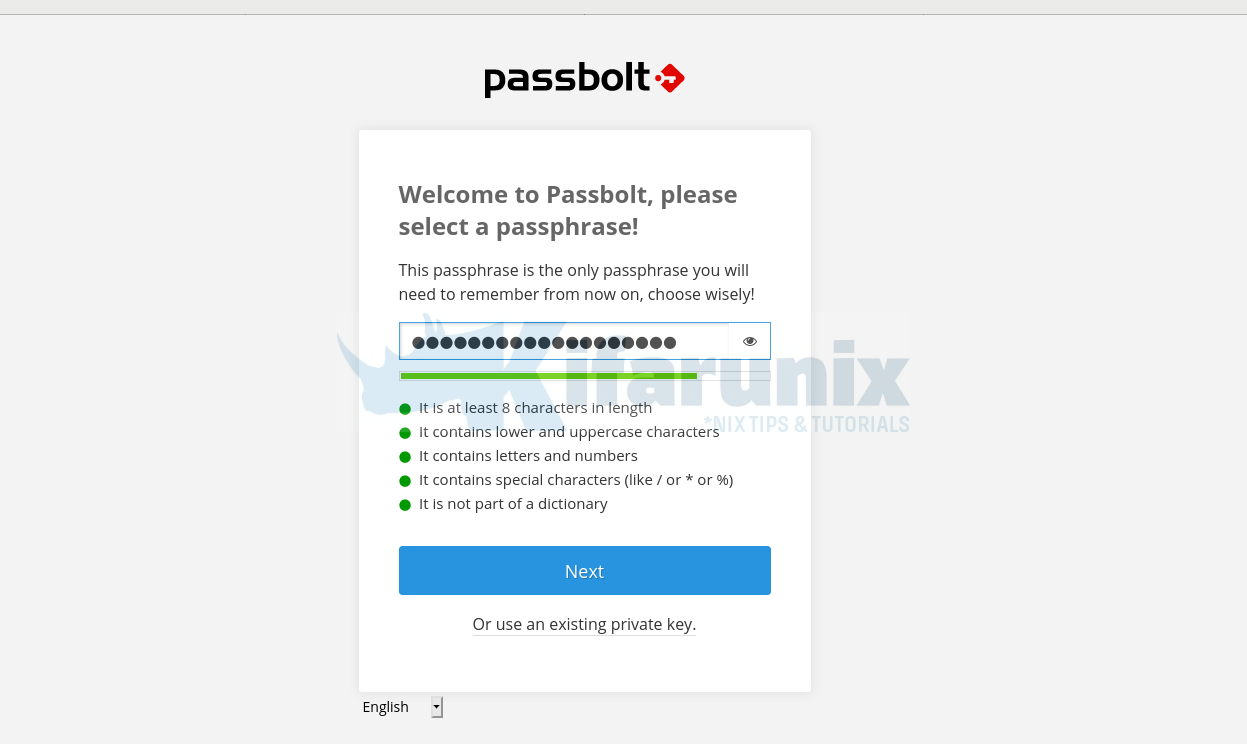
单击下一步下载 Passbolt 恢复套件密钥。将密钥保存在安全的地方。
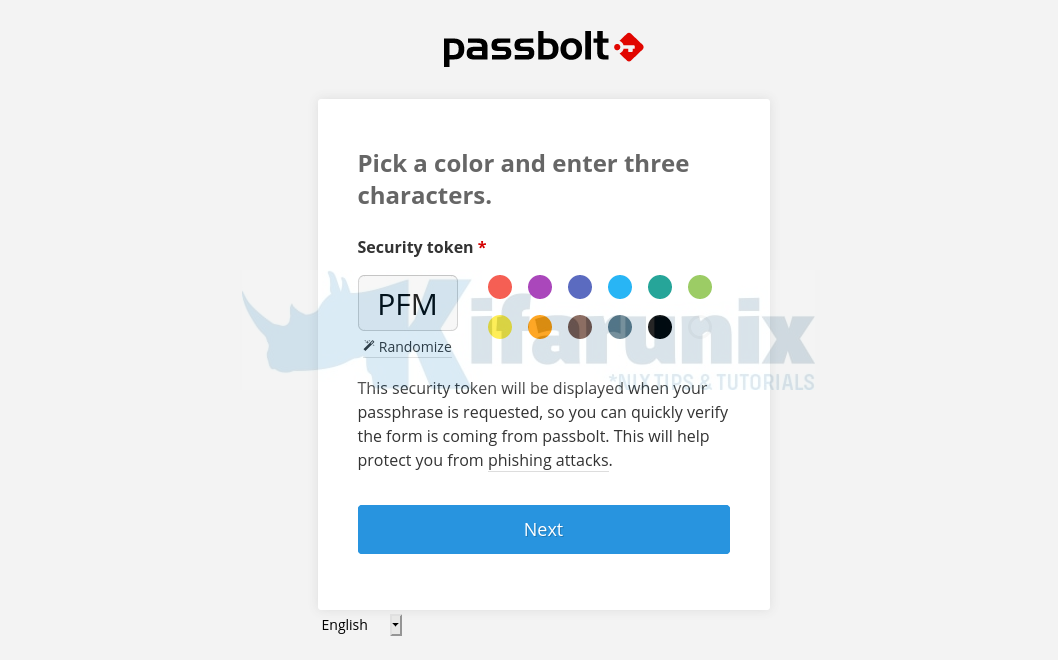
单击下一步并选择一种颜色来识别您的安全令牌。
单击下一步以继续进入 Passbolt 仪表板。
你去吧。

您现在可以开始使用 Passbolt 存储密码/根据需要共享它们。
配置 Passbolt 以发送电子邮件
最后但同样重要的是,您现在可以将 Passbolt 配置为能够发送有关新密码创建、共享、修改等的电子邮件通知。
在此之前,请确保您已配置 Passbolt 电子邮件设置。
cd /var/www/passboltsudo -u apache ./bin/cake EmailQueue.sender当您运行上述程序时,您应该能够收到有关激活您的帐户以及欢迎您使用 Passbolt 的电子邮件。
创建一个 cron 作业来执行此脚本以自动发送电子邮件。
以 Apache Web 服务器用户身份安装 cron 作业, apache.
crontab -u apache -e创建一个始终运行的 cron 作业。
* * * * * /var/www/passbolt/bin/cake EmailQueue.sender >> /var/log/passbolt-mails.log保存并退出 cron 作业文件。
您可以列出已安装的 cronjobs;
crontab -u apache -l您的 Passbolt 密码管理器现已准备就绪。
这标志着我们关于如何在 Rocky Linux 8 上安装 Passbolt 密码管理器的指南的结束。